Can You Add Remote Proximity Keyless Entry To A Jeep?
When you lift the door handle, sensors detect the key in your pocket or purse and unlock the door. This is possible if your vehicle has a Remote Proximity Keyless Entry system.
But can you add Remote Proximity Keyless Entry to a Jeep that doesn’t already have it?
The answer is yes, you can. Although it is not simple, the process is not overly complicated either.
Let’s add a Remote Proximity Keyless Entry to your Jeep.
Table of Contents
What Is Remote Proximity Keyless Entry?
The missing 1% of your 99% flawless Jeep is Remote Proximity Keyless Entry. So, how does Remote Keyless Entry work?

A Jeep Remote Proximity Keyless Entry or a Passive Keyless Entry opens your Jeep door using a nearby proximity key fob. Keep the key fob in your pocket, and the door will open.
Jeep’s Remote Proximity Keyless Entry combines low-frequency (LF) and RFID (radio frequency identification) electronics to create a smart system for your Jeep.
It keeps track of your location when you are away and knows to keep your doors locked.
As you approach, your Jeep detects the RFID-enabled proximity key for the Jeep in your pocket.
Once you are in “the zone,” it switches to high-speed radio frequency (RF), accurately measuring each step. Because of its convenience, people who don’t have it frequently ask if you can add Remote Proximity Keyless Entry to a Jeep.
Which Jeeps Come With a Remote Proximity Keyless Entry?
Jeeps only have a Remote Proximity Keyless Entry system in the most recent models.
Also, you must ask for it specifically when buying your Jeep. It is not available in earlier versions.
Jeep Models with Passive Keyless Entry based on Proximity:
| Model | Standard | Optional |
|---|---|---|
| Wrangler (JL/JLU) | All trims of Sahara and Rubicon since 2022. | Sport, Willys, and 392 trims. |
| Grand Cherokee | All trims since 2014. | |
| Grand Cherokee L | All trims since 2021. | |
| Cherokee | All trims since 2014. | |
| Compass | Limited, Trailhawk, and High Altitude trims. | Sport, and Latitude trims. |
| Renegade | Available on all trims since 2015. | |
| Gladiator (JT) | Available on all trims since 2020. |
Can You Add Remote Proximity Keyless Entry to a Jeep?
Yes, you can. A Passive Entry Kit can add Remote Proximity Keyless Entry to your Jeep.
You can do it yourself. The steps for DIY Passive Keyless Entry include the following:
- Opening the door panel.
- Replacing the door handle.
- Replacing the harness.
- Wiring Verification
- Installing software
Let’s review the steps, precautions, and tools required to connect a Remote Proximity Keyless Entry to a Jeep.
How Can You Add Remote Proximity Keyless Entry to a Jeep?
First, you’ll need a few things.
Requirements:
- 10mm Socket (Either Deep Or Short)
- Extension Pick
- T20 Bit, T30, and A Long T25
- Sharp-Nosed Pliers
- Masking Tape
- Big And Small Non-Line Panel Tool
- JSCAN App
You have to buy a Remote Proximity Keyless Entry kit from any trusted store. With it, you can add Remote Proximity Keyless Entry to your Jeep.
Steps to Follow:
Step 1: Hardware Install
1. Take off the handle cap.
- Two stickers are visible when you open the door.
- Put a long Torx bit inside after removing the upper sticker.
- To loosen the back handle cap, turn the screw bit counterclockwise.
- Remove the back cap entirely.
2. Install the handle and cap from the proximity kit.
- Simply slide the door handle towards the back; it should come off.
- Push the proximity kit handle into the old handle’s slot to secure it.
- After that, simply replace the cap and tighten it.
3. Open the door panel, but only slightly.
- To reveal a T30 bolt, locate the interior handle and pry open the small panel with a pick.
- There are two T20s and two T30s at the bottom and middle of the door, respectively.
- Using a T20 and T30 bit socket, unscrew all of them.
- With a large online panel tool, you should be able to pop open the door panel. However, exercise caution.
4. Open the door harness clip and lock cables by removing the door panel.
- After loosening the door panel, slide it up to fully open it. The lock cables and the door harness clip hold it in two places.
- First, release the door harness. Simply pull on the rigged clip, and it will fall off.
- Side out and pull back one of the two lock cables to unlock it. For the other, squeeze the sides of the white collar out with needle nose pliers. Keep applying pressure to the pliers while pulling on the cable. If you pull a little, the other cable will come off.
- Remove the door panel now.
5. Set up the new harness.
- Remove the kicker panel as if you were removing the doors. Take off the clips that connect to the rear clips.
- The harness socket is located inside. Slide the socket off the mount by pulling on the red tab.
- Pull the old harness off the retainer by sliding it off.
- Slide your replacement harness over the old one. You can now re-insert the kicker.
- Using a t30 socket, remove the screws securing the old harness to the panel.
- With it, reattach the new harness.
- Remove all door panel bolts after taping the panel in place with masking tape.
- There are two rubber retainers in the panel. Pull them off.
- Roll the window down to reveal the two 20 mm bolts. Open them up.
- Remove all of the remaining bolts from the panel.
6. Remove all of the panel’s connections and unplug the old harness.
- Locate and remove the power mirror connector.
- Detach the old harness.
- Inside the panel, you’ll hit a rubber grommet and pull it a little bit.
- Find the end of the old harness by slightly opening the internal panel.
- The wire will eventually end up in the door lock. There is a squeeze connector there. Squeeze it to open the whole harness.
7. Reconnect the new harness.
- While opening the old harness, reconnect all the points of the new harness.
- Remove the old harness from the rubber grommet. Install a new one.
- Connect the new harness to the old harness’s panel socket.
8. Reattach and reconnect the remaining connectors and clips
- Reconnect the power mirror connector.
- Secure all of the bolts in place.
- Reconnect the lock cables and harness clip before you reinstall the door panel.
- Secure the door in place with bolts. You will simply reverse your steps from now on.
9. Verify wiring based on the diagram.
- To ensure you have the correct wiring, open the diagrams and begin at the RF hub in the left quarter panel.
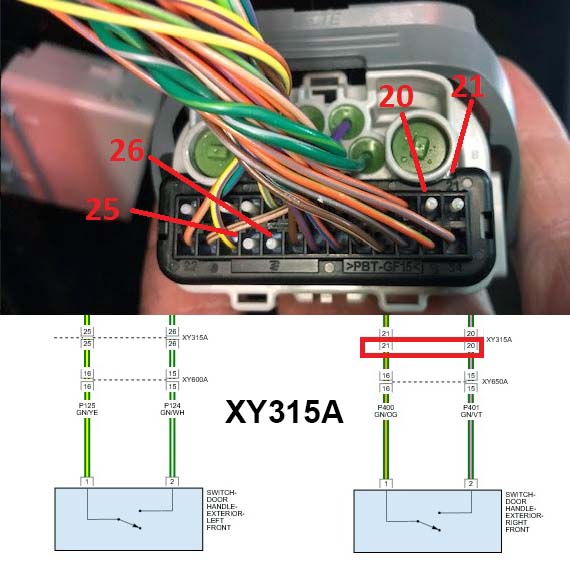
- All of the wiring for all three handles in and out of the RF hub into the body harness is present. Go to the kick panel, where the harness for the body and instrument panel connect. The body side of the connecter (XY315A) has wires in it, but the IP side is empty. 20 and 21 are the driver’s side, while 25 and 26 are the passenger’s. Refer to the images below for clarification.
- Proceed to the connector we’ll be using to remove our doors. This area has no pins or wiring because the wires come from the above connecter.
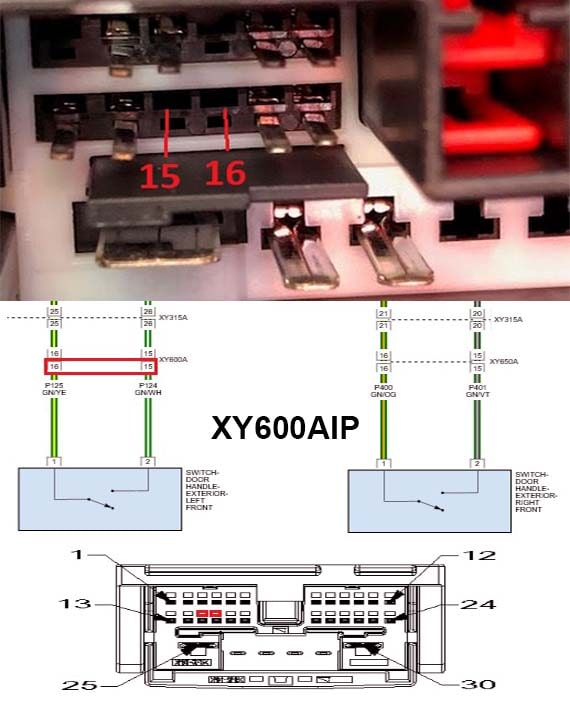
- The quickest way to check for wiring is to disconnect the door removal connector, pull the IP side, and look for wiring in cavities 15 and 16. Refer to the images below for clarification.
Install the required wiring if you don’t already have it. Using a weather pack connector is one option for adding it.
To still be able to remove your doors, you can create a jumper harness using a weather pack connector. Connect everything, and it will work.
Step 2: Software Install
1. Software Preparation
Download the JScan App for your device of choice.
You’ll also need a Bluetooth adapter to connect to your Jeep’s computer. Here is a list of compatible adapters.
The current Jeep models also require a security bypass wire to interface. You can use the AUGOCOM FCA 12+8 universal adapter cable.
This video can be helpful if you’re struggling.
Note: This requires the most recent version of JScan. To use JScan, you must also acquire a license assigned to your VIN (~$23).
2. Software Installation
Proceed to connect the OB2 Adapter > Security Bypass Cable > Jeep Interface.
Launch JScan, navigate to your vehicle, and connect to the Bluetooth Adapter via the app.
Once inside, you should see the following:
#Dashboard #Modules #Adaptation
First, navigate to Adaptation.
Then, navigate to “Passive Entry Settings”
Note: Passive Entry is now available as a standalone option tree in the updated app version.
It was previously located on the Modules Configuration Tab.
If you don’t see Passive Entry as a standalone *YOU CAN’T MAKE THE REQUIRED CHANGES*.
Change the settings in the order shown:
- Passive Entry Present On/Off > Active
- AP1 Left Front > Smart Switch
- AP2 Right Front > Smart Switch
- AP3 Left Rear > Smart Switch
- AP4 Right Rear > Smart Switch
- AP5 Trunk > Smart Switch
Your computer should be programmed to recognize that “Passive Entry” has been installed, and the antennas should be turned on to watch for the key fob. A dealership would define this as “GXD.” We must take the long route and proceed methodically.
Return to the previous tab and go to “Radio User Settings.”
Then, navigate to Passive Entry On/Off > Active.
Once completed, your system should be operational. Get out and put your Lock Button/Handle to the test.
Your key fob must be close to the used door to cycle properly. Congratulations! You have added Remote Proximity Keyless Entry to your Jeep.
Advantages of Remote Proximity Keyless Entry in Jeeps
Adding Remote Proximity Keyless Entry to your Jeep offers numerous advantages.
Convenience
Experience a new level of convenience as you approach your Jeep. Forget about searching for your keys.
With Remote Proximity Keyless Entry, your Jeep recognizes you. The doors unlock effortlessly. It is especially handy when your hands are full.
Effortless Access
Imagine unlocking your Jeep’s doors by simply lifting the handle. Remote proximity keyless entry allows seamless access without needing to physically engage with your keys.
Advanced Security
Modern keyless entry systems use sophisticated encryption and rolling codes. It enhances the security of your Jeep.
This makes unauthorized access challenging for potential thieves.
Resale Value Boost
Investing in advanced technology like Remote Proximity Keyless Entry can positively impact the resale value of your Jeep.
Many buyers actively seek vehicles equipped with these features, appreciating the added convenience and security.
FAQs
How Much Does It Cost to Add Keyless Entry to a Car?
If you opt for a do-it-yourself approach with an aftermarket kit, the cost can range from $200 to $500. This typically includes the necessary components, like door handles and wiring harnesses.
If you prefer professional assistance, installation costs can range from $500 to $800. This includes both labor and any additional components needed for the installation.
If you choose to do it yourself but need a Tazer or similar programmer to activate the function, you’ll need to factor in the cost of the programmer. The Tazer can cost around $300 for a Jeep.
What Is the Difference Between Keyless Entry and Passive Keyless Entry?
People also often wonder about Remote Keyless Entry and Remote Proximity Keyless Entry.
The Remote Keyless Entry and keyless entry are the same thing. Meanwhile, Remote Proximity Keyless Entry and passive keyless entry or Proximity Keyless Entry are the same.
Keyless Entry/Remote Keyless Entry
When using keyless entry or Remote Keyless Entry, you must physically press a button on your key fob to either lock or unlock your Jeep.
It’s a hands-on process. You need to be near the vehicle and engage by pressing that button.
Plus, you’ll typically have a traditional key as a backup in case you need to manually lock or unlock your doors.
Passive Keyless Entry/Remote Proximity Keyless Entry
With passive keyless entry or Remote Proximity Keyless Entry, things get a bit more convenient.
As you approach or move away from your vehicle, the system automatically detects your key fob in close proximity.
It unlocks the doors without requiring you to press a button. It’s a seamless experience, eliminating the need for direct interaction.
The perks go beyond just unlocking; you may enjoy features like walk-away locking, where your vehicle secures itself when your key fob moves out of range.
And depending on the system, you could even have remote starting capabilities.
Read More:
- What Is Headlight Illumination On Approach? Should You Enable?
- How To Tell What Size Lift Is On My Jeep? [Explained]
Final Words
Can you add Remote Proximity Keyless Entry to a Jeep? I hope you got the answer.
It’s not difficult to add Remote Proximity Keyless Entry in your Jeep, especially if you have the right hands and tools.
If you can’t understand the procedure, then you shouldn’t try. Don’t be afraid, but be conscious of your limitations as well.
Simply remove the door panel card, unplug the harness, and insert the new harness inside. Fix everything, and you’re done.
Then, flash your software. Just be careful not to leave anything detached while doing so.